Friday, December 30, 2011

Bordering on Romance - Sneak Peek Sample

Rain, rain, rain, rain...  it seems like all we've had lately is rain.  Honestly, at this point I would rather have snow!  Smiley from millan.net  (And I know I just said last week that I was glad to not have to deal with the slush and messy snow, but at least it would be prettier than what we have!)

Well, in an effort to cheer things up and think of warmer days and months to come (I know they will!), I have a sample made with a stamp set from the upcoming Occasions Mini Catalog that starts January 4, 2012.  That's really only a few days from now.

I used the new Bordering on Romance stamp set and Petite Pairs to make this card. 
So does it make you think of spring?  There are a lot of new products used on this card that will be available in the Occasions Mini Catalog including Adorning Accents Edgelits Dies (to get that flowing cut at the bottom of the Wisteria Wonder cardstock), Adorning Accents Textured Impressions Embossing Folders (for the embossed line above that cut and also the embossed hearts on the Whisper White cardstock), and the 3/8" Pleated Satin Ribbon in Pear Pizzazz (love this ribbon!).  The main flower image was stamped on Shimmery White cardstock to make it easier to watercolor with Blender Pens and dye inks.  The Shimmery White cardstock lets you blend the colors a bit more than you can on Whisper White or Very Vanilla (both of those are coated cardstock, which doesn't work as well for watercoloring).  The card was a fairly close copy of one I saw on Wendy Weixler's blog.

I wish you all a safe New Year's Eve and wish you the best for 2012.  I'm looking forward to sharing more stamping ideas with you in the new year!
Smiley from millan.net


Jayne Stenstrom 
jayne@jaynestamps.com 
http://www.stampinup.net/esuite/home/jaynestamps/

Wednesday, December 28, 2011

Upscale Swap Cards

Today I have a bunch of cards to share with you from our last Upscale Group swap.  I actually received these cards at the beginning of December, but I haven't had the time to show them to you yet.  Underneath the picture is the creator of the card and the stamp sets used.  So, without further ado, I bring you. . . the cards. 
Smiley from millan.net
 Anita Ferre' - Floral Fillers and Grateful Greetings
 
 Candy Leggett - Snow Swirled, Day of Gratitude


 Carla Schultz - Simple Snowflake, Happiest Birthday Wishes
 
 Carmen Ramirez - Simply Soft, Fabulous Phrases

 Jayne Stenstrom - Kindness Matters
 
 Judi Cayton - Array of Sunshine, Petite Pairs
 
 Laura Barto - Tea Shoppe (this is a sneak peak of a new set coming in the Occasions Mini Catalog)
 
Lisa Horton - Greeting Card Kids, Hand-Penned Holidays


If you have any questions about what other supplies were used to make these cards, feel free to contact me!  Until next time...

 
Jayne Stenstrom 
jayne@jaynestamps.com
http://www.stampinup.net/esuite/home/jaynestamps/

Monday, December 26, 2011

Cute Mini Birthday Cakes (tealight candles)

 Animation from millan.net
I hope you all had a wonderful Christmas and enjoyed spending time with family and friends!  We had a very relaxing day - quite laid-back, which was great.  It is a little strange that we don't have any snow.  I'm not complaining - actually I'm rather enjoying not having to drive around in the slushy mess that it usually becomes.  It wouldn't as smooth as this ride, I'm sure...
Animation from millan.net

So I've been wanting to share these for awhile.  Have you seen any of the little "cakes" made with the mini tea light candles?  I bought some of them a few weeks ago and when the ladies got together for our last Chalk-a-holics meeting, we made these.  Aren't they cute?


SUPPLIES: 
Paper:  Mocha Morning Specialty DSP, Soft Suede, Blush Blossom, Regal Rose, and Certainly Celery card stocks.
Punches:  1-3/4" Scallop Circle, Scallop Trim Border, Itty Bitty Shapes Punch Pack 
Other Accessories:  Basic Rhinestones, Bitty Buttons, Shimmer Paint mixed with rubbing alcohol and sprayed on Soft Suede cardstock.
If you have any questions on how I made these, feel free to shoot me an e-mail at jayne@jaynestamps.com.


I also have an adorable video that I just had to share with you.  It's the Twelve Days of Christmas performed by animals (sort of).  Too cute!  If you don't see a video player, you can view the video HERE


Until next time...
Animation from millan.net


Jayne Stenstrom
jayne@jaynestamps.com 
http://www.stampinup.net/esuite/home/jaynestamps/

Friday, December 23, 2011

Top Note Gift Card Holder with Reindeer Stocking Builder Punch

 Smiley from millan.net
Okay, by this time you should have ALL of your Christmas shopping done, presents wrapped, cards made and sent out...  Oops!  I guess I can't really say anything because I only have ONE of those three done (and it's not cards - yikes!).  Anyway, I don't have a lot left to do, but I DO need to get the rest of my cards made and in the mail.  And yes, I know they won't arrive before Christmas, but the week in-between Christmas and New Year's is still part of the holiday, right? 
Smiley from millan.netSmiley from millan.netSmiley from millan.netSmiley from millan.netSmiley from millan.netSmiley from millan.net
Today I have another gift card holder project to show you - along with step-by-step instructions and pictures.  So if you have gift cards that you're giving, you can make up a couple of these adorable holders.  I'm sure the recipient will ooh and aah as much over the presentation as the actual gift card itself!

This adorable idea came from my friend Helen.  I loved her colors (sort of non-traditional), so I kept everything pretty much the same.  Here is what the finished project looks like:
Isn't that reindeer adorable?  Smiley from millan.net So would you like to know how to make one?  Okay, let's get started!

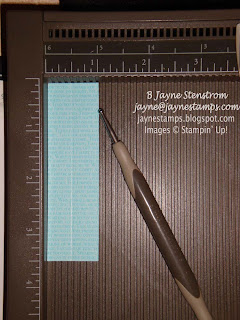
First cut your card stock (this is Tempting Turquoise) into 11" x 4-1/4" (half of an 8-1/2" x 11" piece - cut lengthwise).  Score with Simply Scored Scoring Tool at 3-3/4", 5-1/2", and 7-1/4".
Fold the cardstock so it forms a "W".  Here is a picture from the side.
With the FOLDED edges in the center (on the right in the picture below), place the cardstock on the Top Note Bigz Die as shown below.  The folded edges will be in about 1" to 1-1/2" from the one edge of the Top Note.  You do NOT want to cut through those edges.
This is what it should look like after you have run it through the Big Shot.
 And here is what it looks like opened up.

Fold your shape just at the center line and punch with the Word Window Punch, punching through two layers - but only punching about halfway with the punch.  You will probably need to punch twice side-by-side to get it wide enough for a gift card.

Using the 2-Way Glue Pen, glue the edges of the center section.  Only put glue on the outside edges (because you want your gift card to go in there, remember?)
 
 
Now for some accessories to make it pretty.  Take some coordinating DSP, cut to 1" x 3-1/2" (or so).  Score lengthwise in half.  (This paper is from the Brights Patterns Designer Series Paper Stack.)
Attach it to the outside edge.  The ends will stick out a bit.  Simply cut them off with your Paper Snips, following the curve of the Top Note.

With the Snowflake Punch, punch two "antlers" from Basic Black cardstock.  Punch the reindeer head from Chocolate Chip cardstock and the "collar" from the DSP using the Stocking Builder Punch.  By the way, did you know that the Stocking Builder Punch will NOT be in the next Idea Book & Catalog?  It will ONLY be available during the 2011-2012 Holiday Mini Catalog period and that ends January 3, 2012.  So if you haven't gotten one of these punches yet, I would highly recommend ordering it NOW.  You can order it yourself HERE.  The Stocking Builder Punch item number is 124095, price is $16.95.
After punching the reindeer head and attaching the collar, run it through the Big Shot with the Square Lattice TIEF.  Attach antlers to the front of the gift card holder first and add the reindeer head next.  Additional punches used to make the eyes and nose include the Itty Bitty Shapes Punch Pack and the Owl Builder Punch (circles for the eyes).  The Real Red flower is also from the Itty Bitty Shapes Punch Pack.  Add some bling with a couple of Basic Rhinestones, stamp your saying (Four the Holidays), and you're done!
I hope you've enjoyed this gift card project and you have fun making one yourself!  Until next time...

 
Jayne Stenstrom 
jayne@jaynestamps.com 
http://www.stampinup.net/esuite/home/jaynestamps/

Tuesday, December 20, 2011

Gift Card Holder with Snowflake Punch

Are you rushing around trying to get those last minute things done before Christmas and feeling frantic about it?
Smiley from millan.net

If it makes you feel any better, I'm still not done with my Christmas cards...  Smiley from millan.net

But have no fear, I'm here to help you out - at least with an idea for an adorable gift card holder.  Isn't this cute?
I got this from Carla Schultz in our last Upscale Swap group swap.  This idea can be used for more than just Christmas - like she's done here by making it a birthday card!  The Whisper White card part is tri-folded from the top and bottom and simply slides into the navy blue "sleeve".

SUPPLIES:
STAMPS:  Simple Snowflake, Happiest Birthday Wishes
CARD STOCK:  Night of Navy, Whisper White, Brushed Silver
INKS:  Markers in Cherry Cobbler and Night of Navy, VersaMark pad
ACCESSORIES:  Silver emboss powder, Snowflake Punch, Snow Burst TIEF, Cherry Cobbler 3/8" Quilted Satin Ribbon, Basic Rhinestones

Don't forget to check out the Stampin' Up! Clearance Rack.  There are still a lot of great items on there - but supplies are limited so don't wait!

Until next time...
 
Jayne Stenstrom
jayne@jaynestamps.com 
http://www.stampinup.net/esuite/home/jaynestamps/

Friday, December 16, 2011

SUStars Blog Hop - December 2011 - Holiday Home Decor

Welcome to the next stop on the SU Stars Blog Hop for December!  You should have come here from Eileen's "Stampin' Fever" Blog.  At the time I'm posting this, I haven't seen her project yet, but I'm sure it's adorable!  You can be sure I'll be checking it out soon!

My project is one that has taken me a few years to complete.  Not because it was difficult, but because I kept procrastinating!  Now that it's done, I'm wondering why I let it go so long!  This is one of Stampin' Up!'s Decor Elements - put on a frame so that I can keep using it year after year!  What do you think?

These are fairly easy to do.  You just follow the directions for applying the Decor Element, but put it on the OUTSIDE of the glass for your frame.  It looked a little plain by itself, so I added some Designer Series Paper to the edges and also some red ribbon strips.  After I put the wreath on the glass I realized that I was going to need something behind it, but I didn't have anything large enough (the glass size is about 18" x 24").  So you know how there is always a "picture" in the frame when you buy it?  I just flipped that around to the white side!  I also thought about using some kind of wrapping paper, but I didn't have anything here that would work, so I just went with what was available!  You know they say that necessity is the mother of invention!  The NOEL isn't part of the original Decor Element - I cut those letters using a Decor Elements Sheet with the Serif Essentials Alphabet Bigz Die and applied them.  I think it added just the right touch.

Here is another framed Decor Elements that I made a few years ago.  The ornaments are no longer available, but the "Jingle All the Way" is still in the Stampin' Up! Idea Book & Catalog.  There are a lot of similarities in how I did this picture and the other one.  However, this one is much smaller so I was able to use some of our Designer Series Paper to go behind the images.  You do want something without too much pattern so it doesn't detract from your main images.  I also added a couple of bows at the top of the ornament "hangers".  They are on the outside of the glass.
I love getting this frame out every year and hanging it on the wall.  I usually leave it up through at least the beginning of February, but I'm thinking about maybe making another one with the Flurry Decor Elements (all snowflakes).  I'll have to post a picture for you if I do!

To continue onto the next stop on the hop, you'll be going to Tory's blog at icanstamp2.blogspot.com.  If you started here, you can continue on the hop from here, or you can go back to the start at http://su-stars.blogspot.com/2011/12/december-blog-hop-holiday-home-decor.html

I hope you've enjoyed the projects you've seen so far and have been inspired to try some things for your own holiday decorating!  I also hope you'll come back to visit me again - I'd love to "see" you!
Smiley from millan.net

 
Jayne Stenstrom 
jayne@jaynestamps.com 
http://www.stampinup.net/esuite/home/jaynestamps/