Wednesday, August 31, 2011

Never-Ending Card

There are some things in life that I wish were never-ending. Like some TV shows or movies that end just when everything is finally going right for the main characters, or maybe never-ending candy bowls filled with chocolate that has NO calories Smiley from millan.net (hey, a girl can dream, can't she?), or the beginning of spring, or beautiful sunsets.... Well, actually I think that we enjoy these things because they aren't never-ending -- and I think we appreciate them more for going through the other not-so-fun times.

But you didn't come here to listen to me wax philosophical Smiley from millan.net - you came to see some stamping!

I saw this card in the Stampin' Success magazine (exclusively for demonstrators!) a few months ago. I had it marked to make sometime but hadn't had a chance until my friend Judy came over yesterday for a stamping day. We try to get together about once a month or so to stamp, but we didn't get together much this summer. I guess there was just too much nice weather that needed to be enjoyed (especially out by the pool!). Smiley from millan.net

So here is my never-ending card, starting with the "front" (if there actually is one). Each successive picture is of the card opened the next way. I opened it to the next direction by opening the center fold on each one. (Does that make sense? It's easier to see than describe.) The card size as you see it here is 4-1/4" by 5-1/2" (a standard card size).

Front...
First fold open...
Second fold open... (sorry this picture is a little sideways - the card wouldn't lie flat so it looks a little funky in the photo)
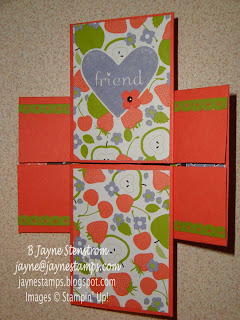
Third fold open...
Back to the front... but if you notice, it's sort of upside-down from the first one - don't ask me how or why. I made it but I still can't really figure out how it works! Smiley from millan.net
Here is the front of Judy's card. I didn't take additional pictures of hers because we did the same thing on the insides -- and my front would have used this DSP except I goofed when I was taping it down. No worries - I just improvised!
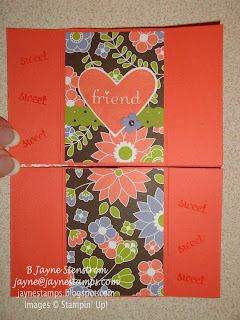
The paper we used is from the Berry Blossoms DSP package. Such great colors together! The card is Calypso Coral and the other cardstock accents are Lucky Limeade, Wisteria Wonder, and Early Espresso with a little Whisper White for the stamped heart (which is from the I {Heart} Hearts stamp set). We also used the Dotted Scallop Ribbon Border punch, Heart to Heart Punch, Itty Bitty Shapes Punch Pack, Silver Mini Brads, and Basic Rhinestones. We also added a few words on the sides using the Fabulous Phrases stamp set.

Now that we've made one, we agreed that it's really not as difficult as it looks. I think we were just a little tentative when we were putting it together. So even if I can't have never-ending chocolate, I can have a never-ending card to send a friend!

Until next time...

Jayne Stenstrom
jayne@jaynestamps.com
http://www.stampinup.net/esuite/home/jaynestamps/

Tuesday, August 30, 2011

Beautiful Backgrounds Part Deux

Stampin' Up! always has gorgeous background stamps, but I think they outdid themselves this year! I have seen so many beautiful cards done with these stamps - and at only $17.95 each, they're a great bargain!

This first one, made by my good friend Cindy Westerink, uses the new Sunflower background stamp which is stamped on some Beau Chateau DSP (the "chicken wire"). The saying is from the Petite Pairs stamp set, but do you notice what it's punched out with? It's one of the punched images from the Blossom Petals Builder punch! Isn't that a clever idea?
The second card uses the Hello, Doily background stamp and was made by Carol Stofer. Notice the little grouping of pearls in the center of the doily - cute, huh? And she also used some of the new 1/2" Scallop Dots Ribbon - two pieces side-by-side with some 5/8" Organza Ribbon over the center. She also used the Petite Pairs stamp set. It's such a great set - you'll definitely want to get one to have for yourself. I love "sayings" stamps. I really get my money's worth because I can use them over and over.
Carol and Cindy always have such wonderful cards! I'm fortunate enough to be in regular card swaps with both of these talented ladies!

And one more card using the Sweet Floral background stamp. I showed this to you recently, but I thought it was worth showing again.
Hope you've enjoyed these great cards made with background stamps. If you don't have these particular stamps yet, you should get them... because I'm sure I'll be showing more samples that use these stamps, and then you KNOW that you'll want them for yourself. (At least that's how I am!)

Until next time...

Jayne Stenstrom
jayne@jaynestamps.com
http://www.stampinup.net/esuite/home/jaynestamps/

Monday, August 29, 2011

It's Raining Flowers and Buy 3 DSP, Get 1 Free Ending Soon


Okay, it's not literally raining flowers, but I thought that made a cute title, don't you? And I would prefer sometimes that it DID rain flowers instead of water. Wouldn't that be pretty? Smiley from millan.net

Raining Flowers was one of our FREE Convention stamp sets. I immediately liked it when I saw it in the catalog, but since I knew we were getting it at Convention, I had to be patient and wait until then to get mine.

This card is one that I CASE-d from someone else (I don't remember who), but I loved the different way it "opened"...
Actually, it doesn't open at all, you just slide out the insert. Clever idea, huh?
This card was a swap from Diane Kipp. She paired the Raining Flowers set with the Berry Blossoms Designer Series Paper. I love the colors used on this card! She also used some of the new 3/8" Ruffled Ribbon in Lucky Limeade and some of the In Color Designer Printer Brads (aren't they cute? I love the polka dots on the brads!)
I really like the Berry Blossoms DSP. Actually that was one that I chose when I placed my order in August for the Buy 3, Get 1 Free promotion. If you want to get some free Designer Series Paper, you HAVE to get your order in before midnight on August 31st. Contact me and I'll be happy to place your order for you, or you can order yourself by going to my demonstrator website at http://www.stampinup.net/esuite/home/jaynestamps/. Don't miss out on this great offer!

Until next time...
Jayne Stenstrom
jayne@jaynestamps.com
http://www.stampinup.net/esuite/home/jaynestamps/

Do you live in the USA and need a copy of the new Idea Book & Catalog? The cost is only $9.95. Send me your mailing address to jayne@jaynestamps.com and when I've received your payment, I will mail the catalog directly to you (shipping to you is free!).

Are you getting inspiration from my blog? One way to help support it is to order your Stampin' Up! products through me. Click HERE and then on the "Shop Now" button to place an order. Are you interested in becoming a Stampin' Up! demonstrator, receive a 20% discount on products, and earn instant income on orders? Consider being part of my Stampin' Up! team and start your own business. You can get more information HERE or you can contact me at jayne@jaynestamps.com.


Saturday, August 27, 2011

The evolution of a card

Have you ever had an idea for a card, but when you made it, it just didn't look quite right? Like it "needed" something else? Well, that happens to me all the time. So I thought I would show you a card I was working on this past week for a workshop make-n-take project and how I brought it up to where I was satisfied with it.

First off, I wanted to make a card that showcased some of our DSP because of the August special. And because I was using the Well Worn Designer Series Paper, I could make the card look a little more masculine. I find that making cards for guys is much more difficult for me than making cards that are for women. Smiley from millan.net

Here is the first run at this card. It uses the Word Play stamp set and the Texture Jumbo Wheel. I also used the 1-3/8" square and 1-1/4" square punches, and the Blossom Bouquet Triple Layer Punch to make the "bows". The words were colored with markers (Soft Suede and Cajun Craze). It's not bad, but I thought it needed something more.

The next try was the same except that I ran the Not Quite Navy cardstock through the Big Shot with the new Stripes Textured Impressions Embossing Folder. That helped give it some more depth but I didn't like all of the blank space on the left.The Best Friends Forever stamp set was sitting on my desk (this is one that demonstrators got FREE at Convention this year!) and I thought, what if I added the leafy image from that stamp set in the upper left-hand corner? I inked it with Soft Suede and then stamped it off once before stamping on the Very Vanilla cardstock. I think it draws your eyes down to the "Wish Big" saying now.
Now the card looked complete to me - and I must have made good choices because the ladies at the workshop all commented how much they loved it! So sometimes if your card seems a little "flat", try adding some dimension with a textured impressions folder, or thinking outside the box by adding an image to accentuate it. There is one caveat, however, and that is that sometimes "less is more". Sometimes it's best to just back away from the card and let it be. You can always add a little something to a card, but it's really hard to take something away once it's on there.

Hope this has given you some ideas for your next card creating session. I'll be back soon! Until then...

Jayne Stenstrom
jayne@jaynestamps.com
http://www.stampinup.net/esuite/home/jaynestamps/


Thursday, August 25, 2011

And here's the rest of the story...

That's my little reference to Paul Harvey and his "Rest of the Story" programs. I would always get hooked on listening to those while driving in the car, and if I reached my destination, I wouldn't be able to get out of the car until I heard "the rest of the story"! (For those of you who have no clue what I'm talking about, just skip on ahead...) Just giving a clue to my age here. Smiley from millan.net


Anyway, today I have the rest of the projects from our stamping day last week.

First up is Lou Ann's card. I love the vintage look of this! She used lots of great new things on her card including the oval Designer Frames Textured Impressions Embossing Folder, the Stripes embossing folder, Well Worn Designer Series Paper, and the Easy Events stamp set. Also used on this card were the Woodgrain background stamp, Victoria 5/8" Crochet Trim, and Vintage Trinkets. It's hard to see, but in the center of the cuckoo clock is one of the Vintage Trinkets brads. Did you know that they look like little buttons? So cute! Almost all of the edges are sponged, which adds to the vintage look. I love sponging. Ask any of my customers or good stamping friends and they'll tell you. Smiley from millan.net
Next is Judy H's card. You may not be able to tell in this picture, but the "cake" is made from chocolate nuggets!! This was an idea that we saw on main stage at Convention. I was so glad that Judy brought this for us to make because it had been on my "to do" list since I got back, but I wasn't sure when that was going to happen. The lacy table skirt is made with the Lace Ribbon Border punch. Clever!
I love the use of the Beyond the Garden Designer Series Paper in this card that Diane K. designed. Many of our DSP patterns are quite large and sometimes it's hard to know what to do with it on a card. I think this is such a great idea! By cutting the DSP square into smaller 1" squares, it just gives it a little more interest and almost a window pane look.
And this sweet little box was a gift from Sara to all of us. She had made them up before we got together and just gave them to us. Of course, I love chocolate, so besides being adorable, I like the candy too! Smiley from millan.net
I think Sara used the Matchbox Bigz XL Die with a clear window sheet for the "sleeve". Isn't this a great idea for a little thinking of you gift for someone?

This is also a good time to remind you that the Buy 3, Get 1 Free Designer Series Paper special is only available through next Wednesday. There are some great ideas just on today's post that use the DSP and now's your chance to get some of it for FREE! You can order yours by going to my demonstrator website HERE.
Until next time...

Jayne Stenstrom
jayne@jaynestamps.com
http://www.stampinup.net/esuite/home/jaynestamps/